Managing Access Control for Activities
As an administrator, you can control access to the Campaign Management activities in your Uptempo instance by defining access control policies:
-
Access control policies consist of one or more individual statements. Each statement defines a specific access permission scope (what a user can access, and how they can access it).
-
After creating an access control policy, you enforce it by linking users or groups to it.
-
Whenever a user in your Uptempo instance interacts with Uptempo Campaign Management (i.e. the Activities section), the access control system evaluates the statements within the policies that apply to that user, and makes a decision whether to grant or deny access to the user for the interaction.
For a more detailed explainer on how Uptempo's access controls for activities work, see Activity Access Controls.
This article provides an overview of the practical aspects of managing access control for your Uptempo activities, including where to find the access control settings, and how you can use them to create and maintain access control policies for your Uptempo instance.
Open the Access Control Policy Settings
You can manage the access control policies in your Uptempo instance by opening the access control policy settings page.
To open the access control policy settings, follow these steps:
-
In the Uptempo navigation menu, click
 Activities.
 -
In the Activities section, click
 Settings.
The Activity Configuration page opens.
-
On the Activity Configuration page, click Access Control > Policies.
The Policies page opens, and displays all of the Plan access control policies that currently exist in your Uptempo environment.
Policies Page Overview
Default Policy View
The Policies page contains separate entries for all existing policies. Each entry contains the following details:

-
Name: The name given to the policy.
-
Description tooltip: Displays the description text entered for the policy on hover.
-
Teams: The number of teams the policy is linked to.
-
Users: The number of users the policy is linked to (not counting any users linked as part of a team).
-
Created: The date the policy was originally created.
-
Creator: The name of the administrator user who created the policy.
-
Last Updated: The date the policy was last modified.
-
Updated By: The name of the administrator user who last modified the policy.
Expanded Policy View
You can expand each policy to see the statements it contains and the users or teams it is linked to.
To expand a policy and view its details:
-
Select the policy you want to view and click the
 Expand button on the policy's entry.
The policy expands to display additional information.
In the expanded view, you can see the following details:

-
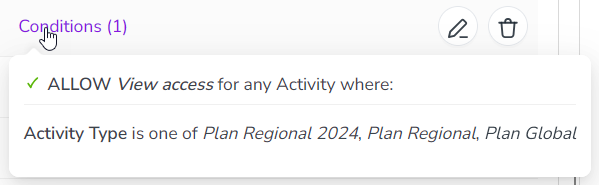
Policy Statement: Lists all the statements that the policy currently contains, with a description of each statement's scope.
-
Conditions: If a statement contains conditions, displays the number of conditions. On click, displays a list with details of the conditions:
-
Linked team(s) / user(s): Lists all of the users and teams currently linked to the policy.
From this page, you can:
Setting Up Access Control Policies and Statements
Access control policies are the basic organizational unit of activity access controls. Policies act as containers for access control statements, and are also used to apply those statements to specified users.
The basic workflow for setting up and configuring an access control policy is:
-
Create the access control policy: Set up a new access control policy to define and enforce a set of permissions for a specified group of users.
-
Create access control statements within the policy: Add one or more statements to the policy that define permissions granted to users connected to the policy.
-
Link users or teams to the policy: Connect users (either individually, or by team) to the policy to apply the permissions it defines to them.
For instructions on how to set up access control policies and statements, see Creating and Configuring Access Control Policies and Statements.
Important
Access control in Uptempo Campaign Management is based on the "deny by default" concept. This means users can only access activities and perform actions for which they’ve been explicitly granted permission.
To ensure users of an Uptempo instance can effectively use Campaign Management, administrators must create and assign access control policies to all active Plan users.
Maintaining Access Control Policies and Statements
After you have set up your access control policies and statements, you can maintain them on an ongoing basis by:
-
Editing policies
-
Deleting policies
-
Changing the users that are linked to a policy
-
Editing the statements in a policy (or adding new statements)
-
Deleting statements from a policy
For instructions on how to make changes to your existing access control policies and statements, see Maintaining Access Control Policies and Statements.